

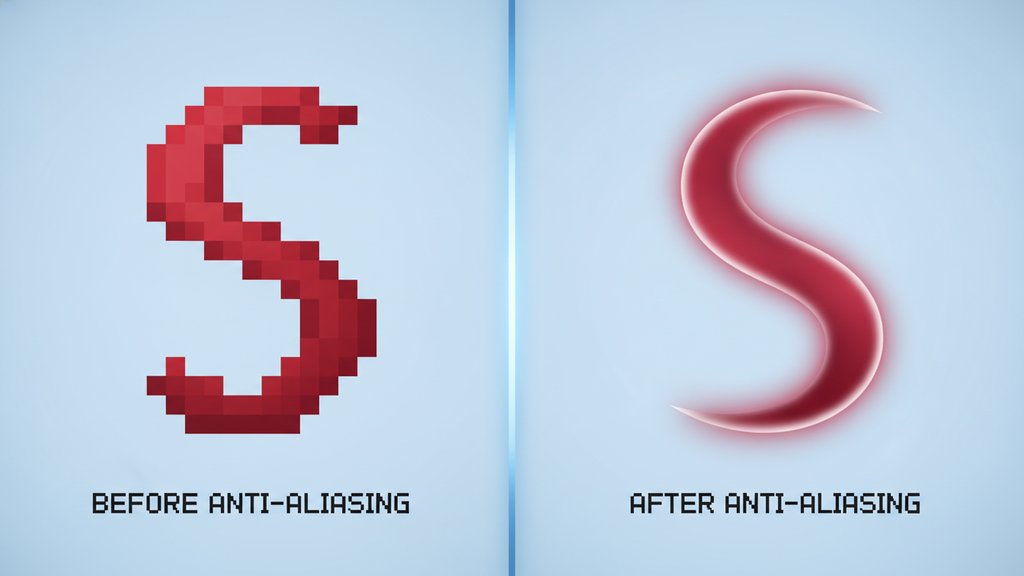
Anti-aliasing is a smoothing technique that softens the jagged, stair-step edges you see on curved or diagonal lines in digital images. It works by blending the colors along an edge, adding partially shaded pixels between the object and its background so your eye reads a clean, smooth line instead of a blocky one. Without image anti-aliasing, a diagonal line drawn on a pixel grid looks like a staircase, and those rough steps are exactly what the technique erases.
Content Table
Why jagged edges happen in the first place
Digital images are made of square pixels arranged in a grid. A pixel can only be one solid color, so when a shape's edge falls between two pixels, the software has to pick: does this pixel belong to the object or the background? That all-or-nothing choice is called aliasing, and the visible result is the jagged staircase pattern nicknamed "jaggies."
The effect shows up most on:
- Diagonal lines, like the slanted stroke of a letter "N" or a roof line in a screenshot.
- Curves, such as circles, logos, and rounded corners.
- High-contrast edges, where a dark object meets a light background so the steps stand out sharply.
These rough spots are formally called aliasing artifacts. The term comes from signal processing: when you sample a smooth signal (the true shape) at too low a resolution (the pixel grid), fine detail gets misrepresented. You can read more about the underlying idea on the Wikipedia page on aliasing.
What is anti-aliasing and how it works
Anti-aliasing fixes the problem by refusing to make that harsh all-or-nothing choice. Instead of coloring a pixel fully black or fully white, it looks at how much of the pixel the object actually covers and shades it proportionally.
Imagine a black diagonal line crossing a pixel that is roughly 40% covered by the line. Without anti-aliasing, that pixel is either black or white. With anti-aliasing, it becomes a medium gray, about 40% of the way from white to black. Repeat that across every edge pixel and the staircase blurs into what your eye reads as a smooth slope.
This is why anti-aliased edges look slightly soft up close but clean at normal viewing distance. The goal is better edge quality at the size people actually view the image, not pixel-perfect sharpness under a magnifying glass.
Common anti-aliasing techniques
Different tools and games use different smoothing techniques, trading quality against speed. Here are the ones you will run into most often.
| Technique | How it works | Best for |
|---|---|---|
| SSAA (Supersampling) | Renders the image at a higher resolution, then shrinks it down, averaging pixels together. | Highest quality when performance is not a concern. |
| MSAA (Multisample) | Supersamples only along detected edges instead of the whole frame. | Real-time 3D graphics and games. |
| FXAA (Fast Approximate) | A post-process filter that finds and blurs edges after rendering. | Low-cost smoothing on weaker hardware. |
| Vector rasterization | Calculates exact edge coverage when converting shapes to pixels. | Fonts, icons, and logos. |
Supersampling is the most intuitive: draw everything bigger, then scale it back. That downscaling step is closely related to how careful resizing images without losing quality works, since both average groups of pixels into cleaner intermediate colors rather than dropping detail outright.
One reason vector graphics never show jaggies is that they store shapes as math, not pixels, so the software can anti-alias fresh at any size. If you want the full comparison, see our breakdown of vector versus raster images.
Subpixel rendering for text
Text has its own specialized approach called subpixel rendering. Every LCD pixel is actually made of three tiny stripes: red, green, and blue. Subpixel rendering treats each of those stripes as a separate light source, effectively tripling the horizontal resolution the renderer can use to place an edge.
This is the technology behind Microsoft's ClearType and the smooth fonts you see across most operating systems. You can read Microsoft's own explanation in their ClearType documentation. The trade-off is that subpixel rendering assumes a specific stripe order, so it can produce faint color fringing if the display is rotated or uses a different subpixel layout.
When anti-aliasing helps and when it hurts
Anti-aliasing is not always the right call. Because it works by blending, it always adds a little softness, and sometimes that softness is a problem.
Use anti-aliasing when:
- You are rendering text, logos, or curved shapes that need to read as smooth at normal size.
- You are scaling images down, where averaging pixels naturally cleans up edges.
- You want photographic-looking edges in illustrations or 3D renders.
Skip or reduce it when you need hard pixel boundaries, like pixel art, screenshots of sharp UI elements, or images where every pixel carries data. Keep in mind that anti-aliasing and image sharpening pull in opposite directions: one softens edges to hide the grid, the other boosts edge contrast to make detail pop. Applying heavy sharpening to an anti-aliased edge can reintroduce a harsh, halo-like fringe, so it helps to know which effect you actually want before you export.
One last practical note: file format matters. Smooth anti-aliased gradients survive best in formats that store full color per pixel, like PNG or WEBP, and can degrade in low-color formats like GIF where limited palettes turn those blended shades into visible banding.

Keep your smooth edges intact when you convert
Anti-aliasing looks great until a bad format flattens those blended pixels into banding. Our free Image Converter moves your files into PNG or WEBP, which preserve full per-pixel color so your smoothed edges stay clean.
Convert your image free →
It improves perceived quality by removing jagged edges, but it adds slight softness because it blends colors along boundaries. At normal viewing sizes this looks cleaner. The only cases where it hurts are pixel art or tiny icons that depend on hard, single-pixel edges.
Pixels are squares in a fixed grid, and each one can only be a single color. When a diagonal edge falls between pixels, the software must snap each pixel fully to the object or the background. That all-or-nothing choice creates the visible staircase pattern called aliasing.
They do opposite things. Anti-aliasing softens edges by blending colors so the pixel grid becomes invisible. Sharpening increases contrast along edges to make detail pop. Applying strong sharpening to anti-aliased edges can create harsh halos, so decide which effect your image actually needs.
Subpixel rendering uses the individual red, green, and blue stripes inside each LCD pixel as separate light sources, effectively tripling horizontal resolution for placing edges. It powers technologies like Microsoft ClearType and makes on-screen text sharper, though it can add faint color fringing on rotated or unusual displays.
Usually no. Pixel art relies on deliberate, crisp single-pixel edges, and blending them turns the artwork muddy. The same applies to tiny favicons and sharp UI screenshots. Leave those aliased with hard edges, and reserve anti-aliasing for text, logos, curves, and photographic content.